


Let Your Light Shine!
The trouble with being signed up to two online courses at the same time, is that it’s easy to neglect one in favour of the other. But I just couldn’t resist trying this lesson, Let Your Light Shine, by Joann Loftus from the Life Book 2013 course. As with many of the lessons, I didn’t have all the suggested ingredients so I did a bit of improvisation – and I must admit – I’m loving the result!


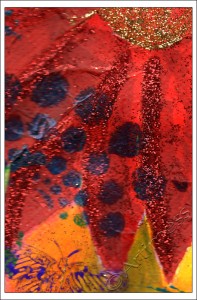
While the scan captures the colours beautifully, it doesn’t show the amazing shine on the finished ‘window’, so I’ve included this detail picture so that you can see how it shines!
I created the ‘stained glass’ using tissue paper, pva glue and acrylic paint- not quite what I was supposed to have used – but it seems to have worked! Cutting out all the pieces and sticking them down was a slow process, but it was cool watching the design come alive as each new colour was added. Next I added the ‘leading’ lines using Pitt Artist Pens (they didn’t like writing on the glue and kept drying up!), and lastly I coloured the border using black gesso.
I still have lots of the ‘stained glass’ left over so watch out for it in other projects! Now I really must get back to finishing the second half of Dion’s class. See you later!
![]()
And More Glitter!
I have never been a great one for glitter, although I have recently become quite addicted to twinkling H2O’s. So when I read the introduction to my next 21 Secrets 2013 class I was a little nervous. Glitter – and more glitter!
Entitled Sparkle-Arkle, Dion Dior’s class promised lots of light catching paint and glitter. Wow! – so many new techniques wrapped up in one class – and this is just part one!


Much glitter later (I’m still covered in it and so are my scanner and my laptop)… here is the final result. I’ve included a detail photo as the scan really doesn’t do justice to the amazing lustre of the final piece. The list of ingredients I used is long: water colour paint, tissue paper, Twinkling H2O’s, gloss gel medium, glitter, stencils, stamps, acrylic paint, matt gel medium, gold thread, gilding flakes, pva glue, glue pen, and perfect pearls. I didn’t have a lot of the suggested products so I had to improvise, but it was great fun!
I’m not going to attempt to describe the process – you need to sign up for the course for that, I’ll just show you this sneak peek of the underpainting.
Now if you’ll excuse me, I’m off to start part two of Dion’s class. More glitter!
![]()
Playing Games
I’ve been busy altering tins and making game cards for Diana Trout’s class on the 21 Secrets 2013 course.

I took two old cough lozenge tins, sanded them and primed them with gesso, then painted them with acrylic paint. It was not a success – the paint started to flake off! So I covered the paint with tissue paper glued on with gel medium. Success! I still wasn’t happy with the way they looked, so I added several more layers of acrylic paint in different colours and another layer of gel medium. Once I was happy with the tins I created their labels using a stamped flower and a digital label. I coloured both of these using Twinkling H2O’s. I made the game cards from double-sided scrapbooking paper, then used the same stamped flower and digital label for the instructions.
I found this class to be quite a challenge, but I’m glad I did it – I learned a lot. Thank you Diana.
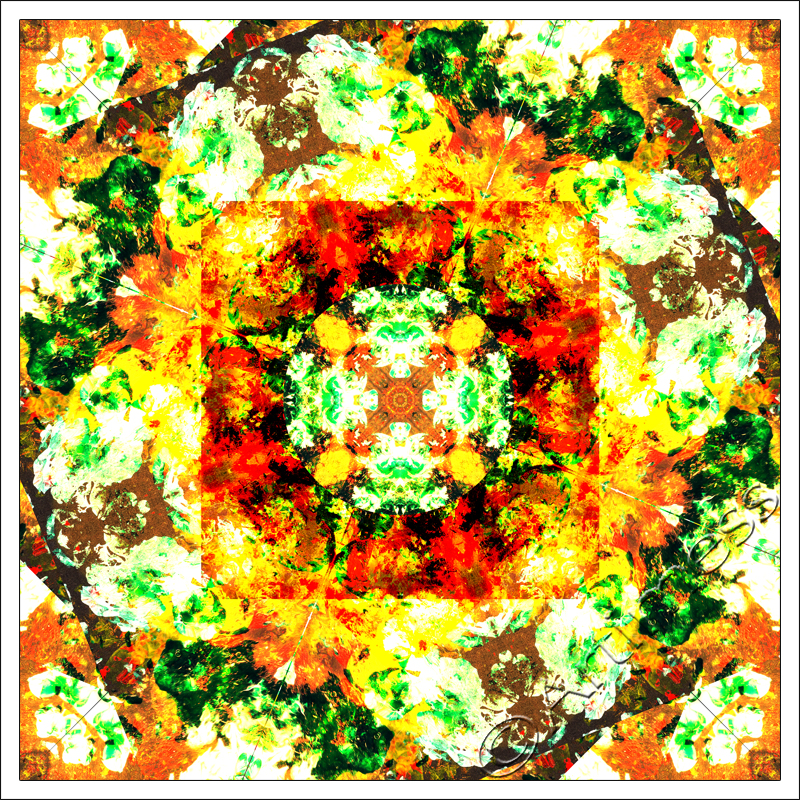
About a week ago I posted this blended image and said I didn’t think I was quite finished with it yet. This is why – I just turned it into a kaleidoscope! I love the colours and all the faces in the patterns. How many faces can you find? I keep losing count!
![]()
New Blooms
Ever since Tam published this week’s Life Book 2013 Lesson from Christy Tomlinson, every spare minute I’ve had has been devoted to getting messy playing with the new techniques Christy taught us.

Along the way I had some leftover paint which I used with a flower stencil to create an image. I scanned this together with the sheet I prepared for making the flowers in the main project, then blended them. It’ll make a good background for something one day!

Finally – the finished product! I had so much fun! I started by creating a mixed media collage background using newspaper, old magazine inserts, bits of old envelopes, washi tape, white acrylic paint, inks, stamps and marker pen for the words. Then came the fun part of making the flowers. You’ll have to do the course if you want to know how, but I used kitchen roll, tissue paper, very runny acrylic paint, stencils, stamps, kitchen foil and lots of gel medium. I had to adapt some of the ingredients as I didn’t have everything on Christie’s list! It was great fun, and very messy! – Thank You, Christie!
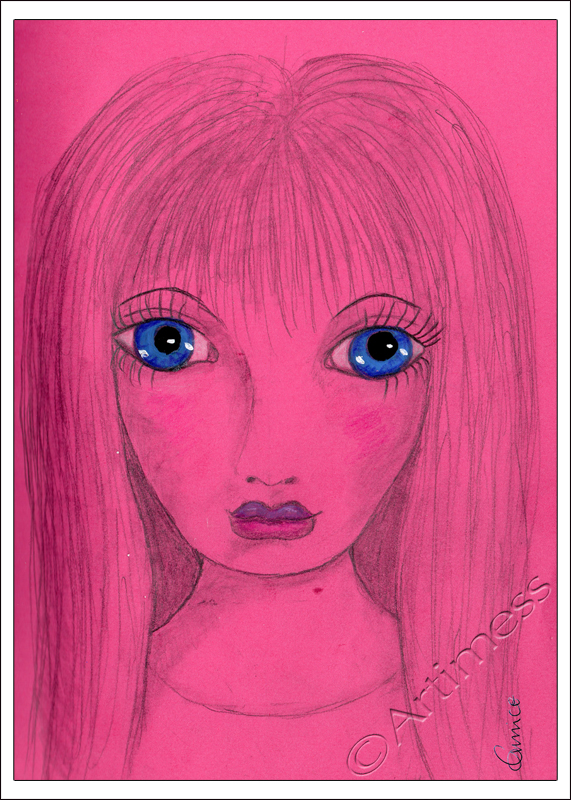
I’ve really been missing drawing this year, so today I drew the Pink Lady! I wasn’t going to colour her at all, but then I had an accident over her right eye with my white marker. So she now has blue eyes! Not a bad cover up job!
![]()
Monochromatic!
I got a bit behind with the Life Book 2012 classes and have only just finished Rhomany’s monochromatic lesson from last week.

One of the disadvantages to having given away most of my craft supplies at the end of last year (read more about that here) is that I don’t have a lot of the supplies that Rhomany used, but I’m very good at improvisation!!
I started off with a collage of newspaper pages then drew the face using a black biro. I didn’t have any ink so I used a mixture of graphite pencils and neocolour crayons to colour and define the face. I used a tiny bit of white gesso for the highlights.
On the left hand side of the page Rhomany used black and white scrapbook paper. As I didn’t have any of that I used layers of black and white tissue paper to create my pattern. Then I used white gesso to create a lighter area on which to add my words which I created using my dymo machine, black paper and a white oil pastel.
Lastly I added some stamping using a Staz-on ink pad.
![]()
Tree of Life
Browsing through blog posts in my rss reader a while ago, I came across a beautiful image called ‘Ablaze’ by Kathryn Dyche Dechairo. I was totally inspired!

This is where the inspiration took me! I started with a torn magazine collage on watercolour paper. I covered that with a sheet of crumpled tissue paper stuck down with lots of semi-gloss gel medium. When that had dried I used my neocolour crayons to add some colour to the mix. Next I drew the outline of my tree using water soluble graphite pencils and coloured it in using the trusty neocolours. The next part involved covering the tree with hot glue! The last bit was adding the text using letter stamps which I then embossed.
I toyed with the idea of adding some collaged leaves, but decided to keep it as a winter tree for now. Maybe I’ll try adding some digital leaves later!
![]()
Celebrating!
I really enjoyed this weeks Life Book lesson with Samantha Kira Harding. Each layer had its own special meaning and took courage to cover and move on. But I’m so glad I did – the finished piece has so much depth.
 - Life Book 2012, Week 42")
This is the first scan taken after the first three layers. Layer one was journalling done using Derwent inktense pencils. This was followed by a layer of white Gesso which made all the journalling colours run and blend together creating a lovely soft background colour. Layer three was a mixture of alcohol inks shaken from the bottles to create nice ink splodges which I swooshed around with a tissue to spread the colour further, and a lino cut which I stamped over the top using distress inks.
 - Life Book 2012, Week 42")
This next scan – done on my lovely new A3 scanner – was taken after the next two layers. It took a while for me to pluck up the courage to add a layer of Gesso to everything and even more courage to start doodling over the top of it, but I’m glad I took the plunge! The doodling on the right page was done using graphite pencil and neocolour crayons followed by a flower collage and face outline drawn in pencil.The left page got a collage of tissue paper.
 - Life Book 2012, Week 42")
The final scan shows the finished piece. The face on the right page was painted using neocolour crayons. The left page had a machine stitched border added and journalling done with a gel pen. It took a few days to complete, but I’m really pleased with the end result. Thank you so much Samantha!
![]()
A mess, a scan and some blending …
It started with an A4 sheet of acetate. I added a generous covering of pva glue followed by a dash of alcohol ink, some lumiere paint, a few sprinkles of glitter and some torn pieces of newspaper. I covered this with three layers of tissue paper (and some more pva glue) then left it to dry overnight!! This morning I assembled my own collage stamp using a selection of unmounted stamps stuck on a large piece of perspex and stamped the front of the acetate using a staz-on ink pad. Result …..

Acetate Experiment
Most people would stop there …. but me …. I had to scan it into the computer …. and then I had to try blending it with something else!! I think it looks quite good blended with last nights Sail Collage. There were two that I really liked …

Acetate Background blended with Sail Collage - 1

Acetate Background blended with Sail Collage - 2
What do you think?
Inspiration Wednesdays
Yes … I know today is Thursday … I’m a little behind this week! But I was inspired by Donna Downey’s Inspiration Wednesdays post to create this collage.

Sail Collage
I created the background back at the beginning of April and scanned it into the computer to use as a base for some of my designs. To be honest … I had forgotten all about it until I came across it tonight when I was hunting through a pile of paper looking for something to use as the starting point of my collage. I’ve just started playing with torn newspaper in my designs, and that was where I began this picture. The rest just seemed to follow!! The sails and flowers were added with tissue paper and I did some finger painting to blend the collage into the background.
More Blended Images and a mini-book!
I’ve been really messy with glue and paint and glitter …. but I think the results were worth it! I scanned the results, then blended them to create these images.

Full Fathom Blended Image

Blended image - Silver/grey shells and things
I was inspired by this episode of “Thursdays with Earl” to make this mini-book. It’s made from a single sheet of 12×12 card and I have covered it with a mixture of papers I have designed and tissue paper!

Owl Flutter Book