


Finally All Done!
I can’t believe how long its been since I last posted here! I’ve decided that unpacking is a lot more stressful than packing … but it’s finally all done – including the 5 boxes which my brother returned to me (after looking after them for the last 18 months) during his visit last week!
So… what have I been up to? I got my paint trolley from Ikea…

I broke up all the packing boxes and saved a big pile of assorted shapes to use as canvases, then started painting some of the smaller ones.

I painted this on recycled cardboard using acrylic paint, acrylic ink and various homemade stamps.

I painted this on a scrap of plywood salvaged from some packaging using acrylic paint, acrylic ink, clear stamps and a staz-on ink pad.
There are lots more to show you, but I haven’t finished scanning them all yet, so I’ll post pictures of them during the week.
I also got a brilliant easel for painting big …

… as you can see – I’ve already started playing with it. This is just the first few layers – I’ve added two more since I took this picture!! I’ll post another picture when it’s finally finished.
I’ve also been playing digital … but you’ll have to wait till tomorrow to see them or I’ll never get this posted.
I’ll leave you with this beautiful view taken on a trip to the Peak District, half an hour from our new home, yesterday.

![]()
Finished Page!
At last all the layers have dried and it’s safe to scan the finished page.
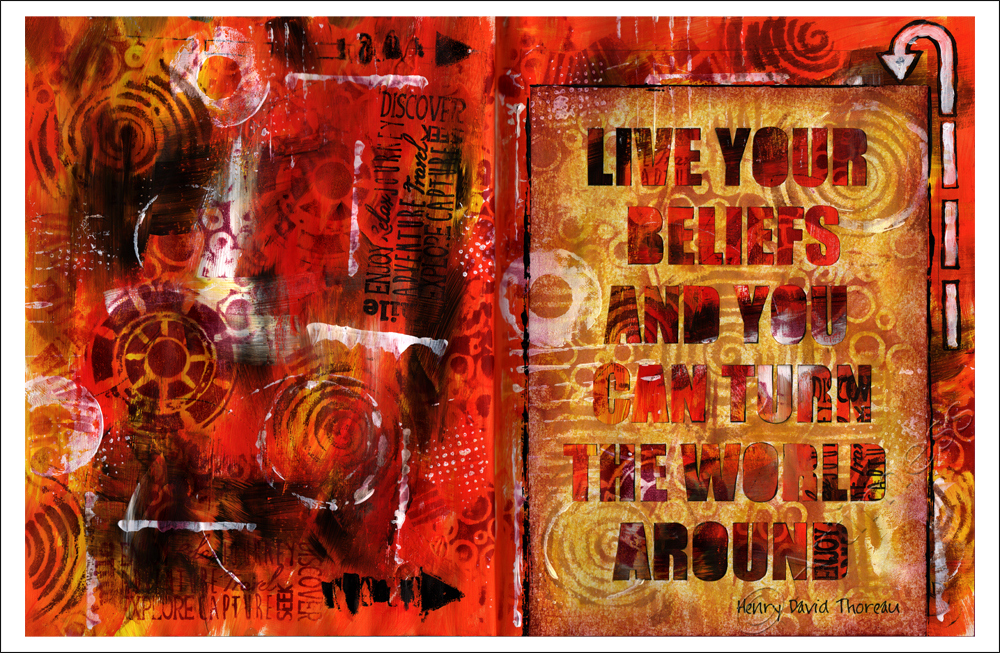
I love how the finished page turned out, and I had such fun making it. The only tricky part was managing the wet media on the thin pages of my new journal, but I managed that by starting with a thickish layer of white gesso and using the acrylic paint with a dry brush. What I love is that you can still see some of the original pages through the layers in places!
Just for a change my ‘ingredients’ list is quite short! I started with white gesso, added layers of acrylic paint, and stamped using various clear and homemade stamps with a staz-on ink pad and some distress ink pads. I printed the quotation onto plain white copy paper then cut out the letters by hand, leaving me with a stencil affect. I coloured this using distress ink pads, then stuck it to the page using a glue stick. Lastly I added some more acrylic paint using an assortment of household items!
![]()
Gratitude!
Still playing catch up with Life Book 2013 classes, today I finished this piece for Tam’s week 10 lesson.

I decided to add my own twist to the lesson by folding my paper in half and cutting a heart shape in the front half to make a heart door. After cutting the door, I started the background using acrylic paint, then added a collage of printed tissue paper, washi tape, and paper ribbon. Next I used Caran d’Ache neocolour crayons and stamping with a staz-on ink pad to add more colour, then finished the front using die cut letters. Once it was all dry, I taped in the ribbon ties and stuck the two halves together.

On the inside, I covered the back of the door with torn tissue paper and gel medium, then set to work making the mini scrolls for the centre from a mixture of torn magazine pages and digital design prints, decorating some of them with stamping. I filled the heart shape with gel medium, and arranged the scrolls on top. Lastly, I made the ‘Gratitude” banner by sticking some die cut letters on a scrap of digital design paper.
I had great fun with this lesson – thank you so much Tam!
![]()
Handmade Postcards
Last Sunday we travelled to Harrogate and visited the Great Northern Papercrafts Extravaganza – great fun! I got some really cool stencils, stamps and dies which I have been playing with this week.
On Monday I signed up to take part in the iHannah’s DIY Postcard Swap 2013. (There’s still time to sign up if you’re interested, you just have to pledge to post 10 handmade cards by 30th March.) So I have been busy this week making my ten cards for the swap.

I started by creating a set of coloured backgrounds using Inktense Watercolour pencils. Next I added a contrasting colour using Acrylic paint and an Artist Cellar Stencil followed by a stamped image from IndigoBlu using a mixture of distress ink and staz-on ink pads. I followed this with a layer of gel medium to seal everything and to stick on the word definition tags, which I created using more stamps from IndigoBlu and a Creative Expressions stencil, and the die cut letters from memory box. Lastly I added another layer using the same stencil with acrylic paint.

I created the backs of the postcards using a free postcard backside from iHannah which I had to resize to fit my postcards, then added a digital stamp which I made using a scan of another Creative Expressions stencil, some hand drawn bird shapes and a quotation from Friedrich Nietzsche.
The completed postcards are now sitting waiting for their recipients addresses to be added!
![]()
Dance!
I’m still having great fun playing with Carolyn Dube’s free Use Your Words workshop. Today I finished Wednesdays assignment.
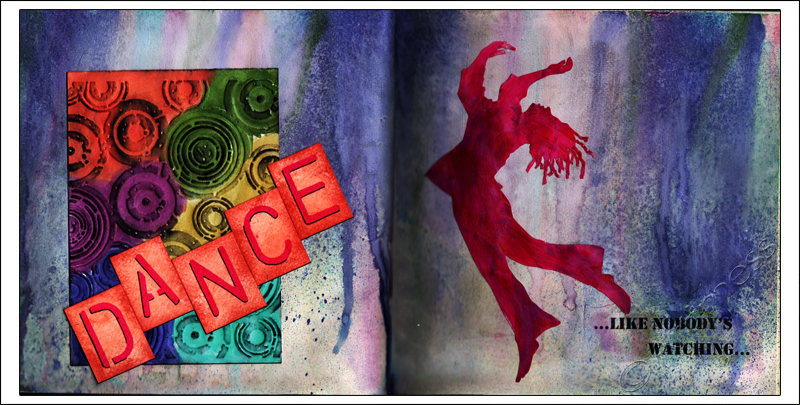
I started by printing the quotation and gluing it to the page, then added colour using a mixture of dripped and sprayed Twinkling H2O’s – very messy! Using the same colours, I painted a panel which I’d embossed using a gear embossing plate, then brushed it with a black staz-on ink pad to give it some extra depth. I created the word dance using a plastic letter stencil then cut the letters up and taped them together. The dancer I cut out from a computer image and painted using acrylic paint.
It was a very messy project, but I had great fun with it!
![]()
Monochromatic!
I got a bit behind with the Life Book 2012 classes and have only just finished Rhomany’s monochromatic lesson from last week.

One of the disadvantages to having given away most of my craft supplies at the end of last year (read more about that here) is that I don’t have a lot of the supplies that Rhomany used, but I’m very good at improvisation!!
I started off with a collage of newspaper pages then drew the face using a black biro. I didn’t have any ink so I used a mixture of graphite pencils and neocolour crayons to colour and define the face. I used a tiny bit of white gesso for the highlights.
On the left hand side of the page Rhomany used black and white scrapbook paper. As I didn’t have any of that I used layers of black and white tissue paper to create my pattern. Then I used white gesso to create a lighter area on which to add my words which I created using my dymo machine, black paper and a white oil pastel.
Lastly I added some stamping using a Staz-on ink pad.
![]()
Just Doodling…
Continuing on from yesterday, I thought I’d stay with the small size and doodle some zentangles. The inspiration for this came from the latest issue of Craft Stamper Magazine.

I created the border round the edges first, then stamped the mouse and text (very old freebies from a magazine), then filled the remaining space with doodles. I used my trusty Rotring Rapidograph pen for the doodling and a black Staz-on ink pad for the the stamping. I finished it off by colouring the mouse using neocolour crayons. I like the contrast the colour makes with the black and white of the doodles.
![]()
Doodle Magic!
This catch-up on the Life Book Course came from Lesson 20 with Jodi Ohl.

I started out by colouring the background using Derwent Inktense pencils. For the doodling and text I used a uniball eye pen, then coloured the doodles using neocolour crayons and a graphite pencil. The two stamps were hand made using pieces of fun foam: I stamped the butterflies using a distress ink pad, and the star using a Staz-on ink pad.
I’m still toying with the idea of adding more doodling. What do you think – do you think I should?
![]()
Embossed Celtic Knots …
I haven’t got around to creating any new knots yet, instead I used the pattern I created to make an embossed frame from aluminium sheet. I thought it looked a bit bland when it was finished so I coloured it with a mixture of alcohol inks and staz-on ink pads 🙂

Embossed Celtic Knot
Then I got the embossing bug and started playing with some words!!

Framing Words