


Into the Bliss!
I’ve just realised how long it is since I posted anything online. I’ve been busy keeping up with Julie’s Mandala Magic classes, I just haven’t got round to posting anything online. So here’s the first instalment – moving on from the Void to the Bliss…
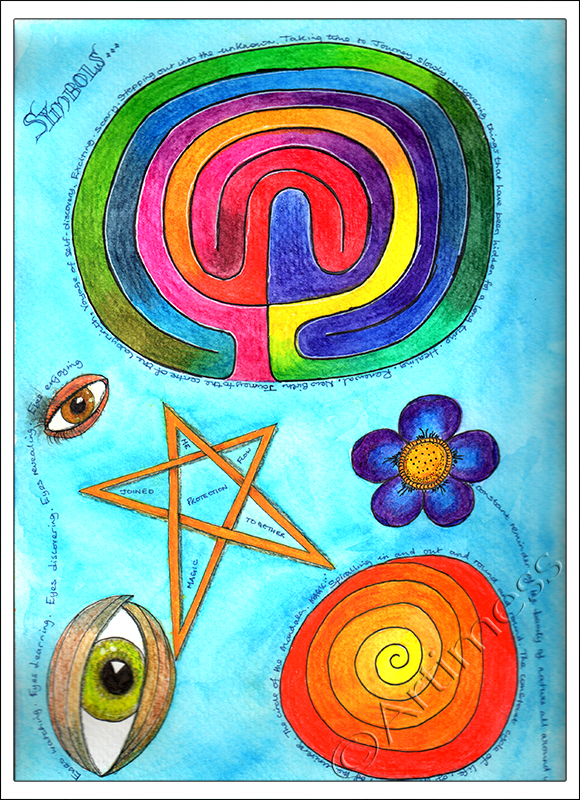
… I created this page of symbols that are important in my life right now.
I found the bliss quite a difficult stage to be in, and had trouble with the shaving foam technique that Julie recommended. After struggling for a while, I gave up and decided to use a mixture of other watery techniques to create the mandalas on this next image.
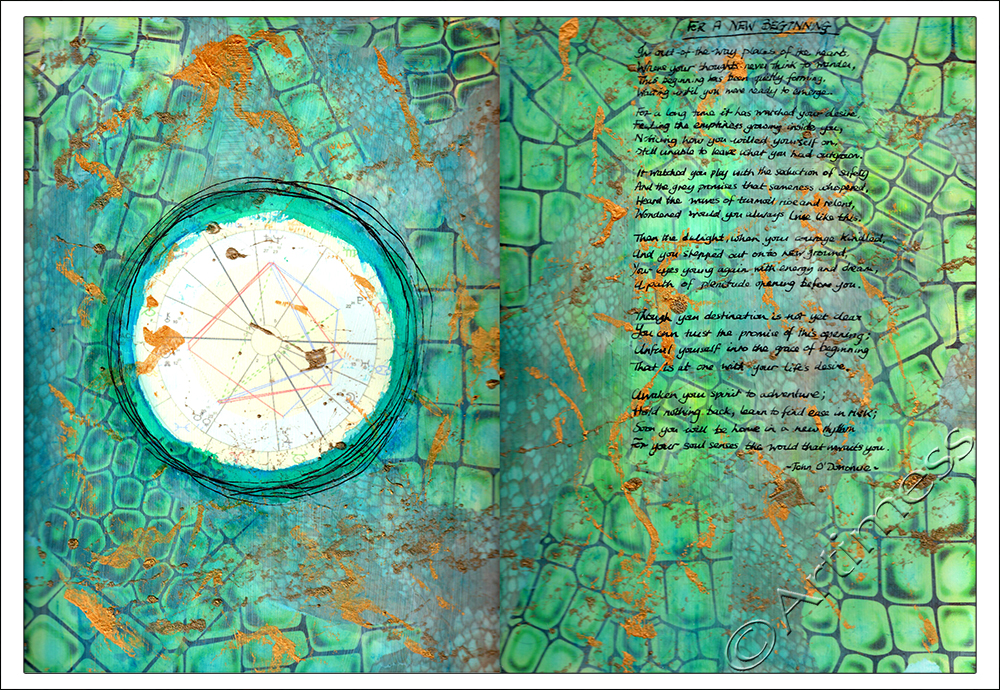
I quite enjoyed making this page which has a background made from patterned tissue paper covered in water activated neocolour crayons. The free birth chart I used comes from the website astro.com. To complete the spread, I handwrote the poem ‘For A New Beginning’ by John O’Donohue.

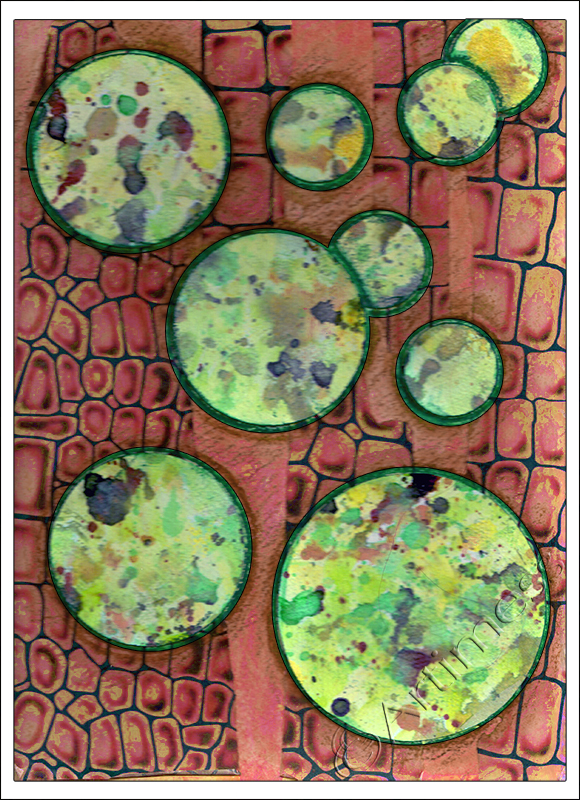
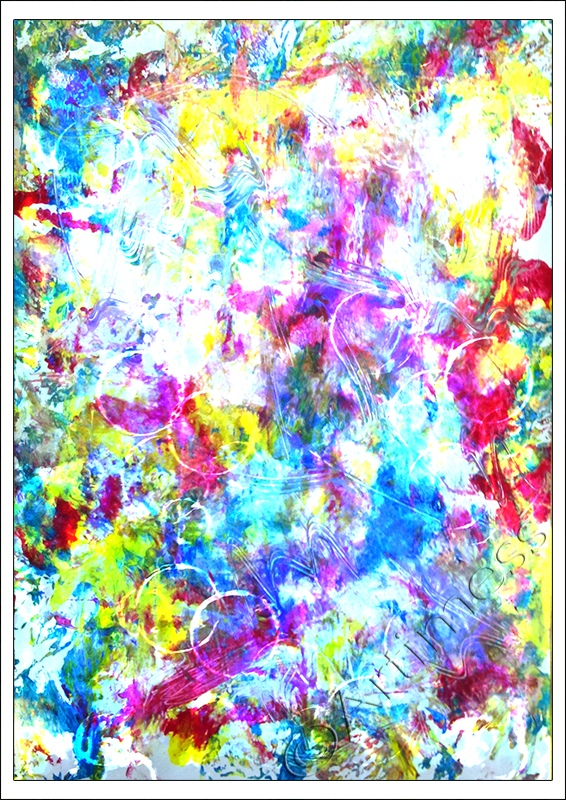
Slightly apart from making mandalas, I’ve been playing with paint in a very free way and have taken a few of those images and created this blended mandala. Keep watching for the next instalment!
Creativity Rocks!
Creativity rocks! I’ve been so busy writing my dissertation that I haven’t had time to do anything else. But I took a couple of days off last week and did a bit of catching up!
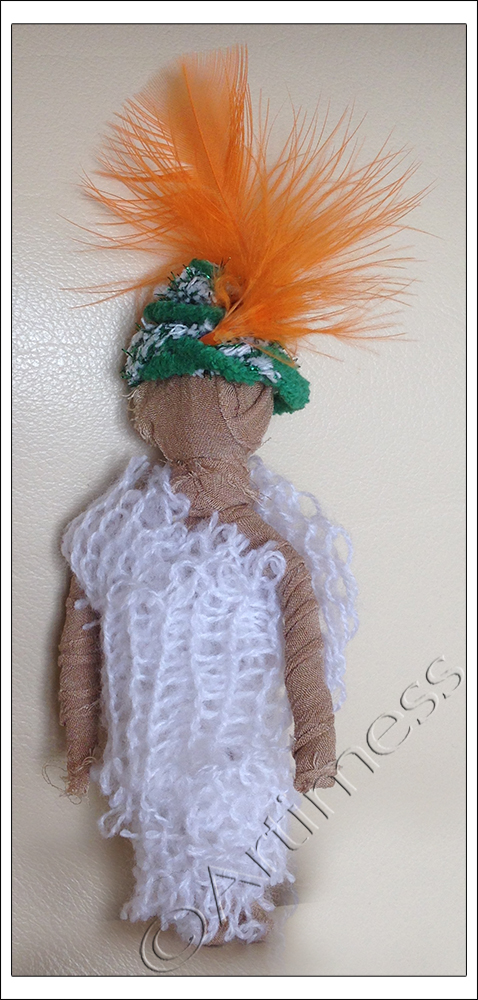
A couple of weeks ago we had our dissertation tutorials and as part of the tutorial, our group were asked to create an image to represent our finished dissertation. I knew I had to create a doll, but as we didn’t have much time for the art work I knew she had to be simple. So I made a wrapped pipe cleaner doll and called her “All wrapped up with a feather in her cap!” Do you like her?

This image started out as a photograph of the kitchen sink with splashes of water all over it. Then I blended a painting into it – et voilá!
This one is a blend of two paintings created during a recent painting workshop.

I’ve been fascinated by mandalas for a long time as any of you who have followed my blog or flickr stream will know. So when I saw Julie Gibbons was running a five day free course, I just had to sign up and play along. I must say, the course is one of the most comprehensive mandala courses I have ever seen and I am learning so much. Thank you Julie. This is my first mandala created on day two using a pencil drawn grid, neocolour crayons and watercolour pencils.

And I just couldn’t resist playing digital with the mandala after I scanned it!
![]()
Blogalong with Effy!
I’ve not been blogging very regularly of late, so when I got effy’s newsletter today and saw that she was hosting a blogalong during August, I thought it would be a good idea to sign up in an attempt to complete thirty posts in thirty days!
Meanwhile, I’ve been back to playing catch up with the Life Book 2013 lessons. I started with Danita’s great class entitled Key to Freedom. The class started with a link to this cool podcast from Tarah Brach
The theme of the lesson corresponded exactly with the July Rumi Project quote over at the Glitterhood, so I had to incorporate it!
“Why do you stay in prison,when the door is so wide open?”

I started out by drawing the girl and the cage in pencil, then painted them using masking fluid before journalling on the background using a white gellyroll pen. I then painted over everything using Twinkling H2O’s. When everything was dry, I peeled off the masking fluid, coloured the girl using neocolour crayons and painted the cage with Twinkling H2O’s. Lastly I wrote the Rumi quote using a white Uni Paint Marker.
This week’s class was from Dina Wakley.
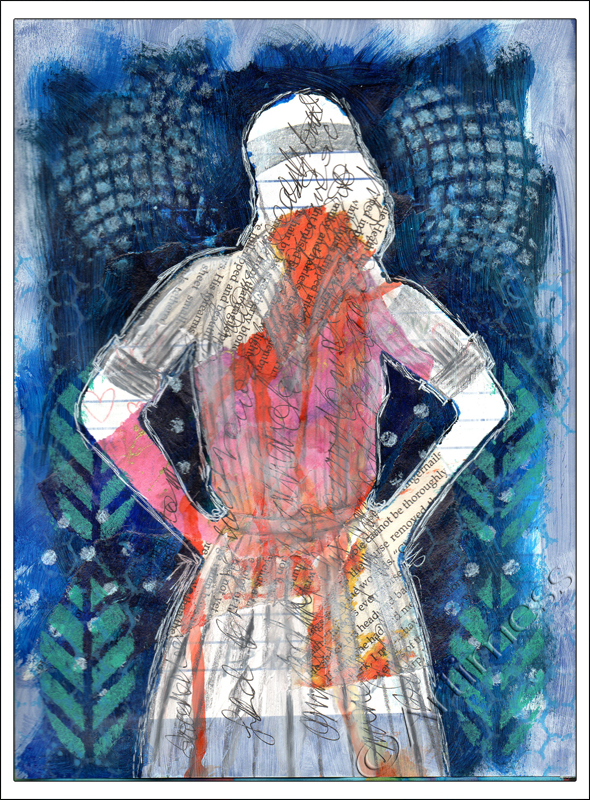
I started the page with a coat of white gesso then added some collaged book pages and old scanned artwork. Next I dripped some ink down the centre of the page and journalled across it, then placed a silhouette mask I created over the top and used acrylic paint to cover most of the page around the mask. I used stencils to add some interest to the background, and lastly, added some detail to the silhouette using a Stabilo All pencil and white acrylic paint. I found creating this page very therapeutic – thank you Dina.
![]()
Recycled Journal

Ever since I saw Rae Missigman’s ‘Go Green’ class on 21 Secrets 2013 I have been longing to have a go at making a recycled journal following her instructions. I have been an avid recycler for many years and have made use of many books in art projects, but I have never before taken one apart and reconstructed it, so this was a new adventure for me! My first step was a trip to my local Charity Shop to find a suitable hard back book to turn into my journal. These are the before and after pics!.
As usual I couldn’t quite bring myself to follow all the instructions…

… plus I didn’t have all the recommended ingredients, so I improvised a bit! The biggest change I made was to the binding. Because I had 7 signatures and my pages were quite heavy, I thought it better to use a different binding format to the one Rae taught. I used this brilliant tutorial from Sarah to learn how to do the binding the way I wanted.
But I digress! Having chosen and purchased my book for the princely sum of £1, the first task was to very carefully take it apart, removing all the signatures. Next came the fun part of decorating the cover, followed by the much trickier part of reassembling it into a book again! I started the decorating process with lots of layers of gesso, clean and painty tissues, and coloured inks dripped and sprayed. Once I was happy with that I added some scraps of material which I machine stitched very carefully to the cover – I only broke one needle in the process! Then came the embellishments which I added using hot glue and a material wrap to keep it closed. I am always envious of my American peers who seem to be able to purchase waxed bookbinding thread in assorted colours quite easily. I always end up waxing my own thread – and getting melted wax all over my cooker! With most of the book pages safely restitched within the covers I moved to inside the book.
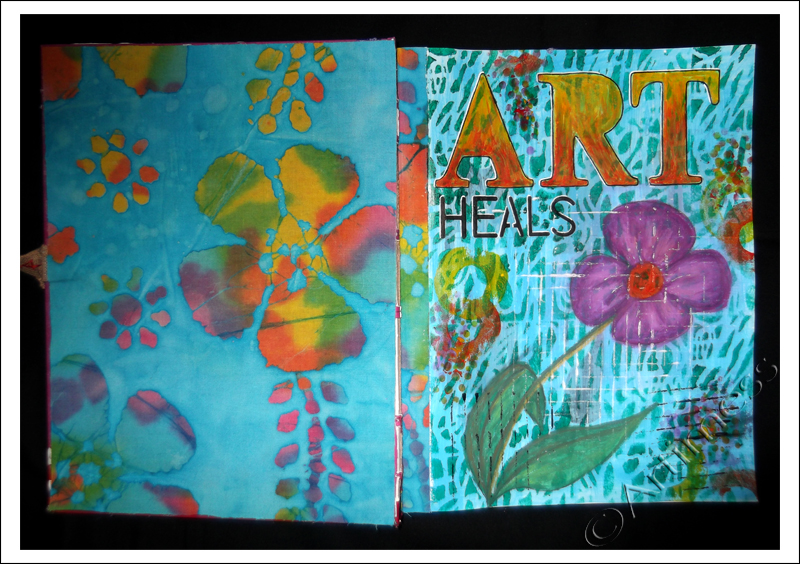
I covered the inside of the covers back and front with fabric which I stuck in using iron on fabric glue, then set to work creating a title page for the book. I started off with a layer of gesso, then added several layers of acrylic paint using a mixture of stencils and assorted stamping implements. I used letter stencils to create the titles and neocolour crayons to draw the flower.
I’m really pleased with the way the book has turned out and can’t wait to work on some more pages! Thank you Rae for a really inspiring Class.
![]()
Faces and Emotions
The last part of Misi B’s Life Book 2013 Class was to journal about emotions on the back of the page then to draw a group of faces showing different emotions. Not the easiest thing in the world for me – but I gave it a go!
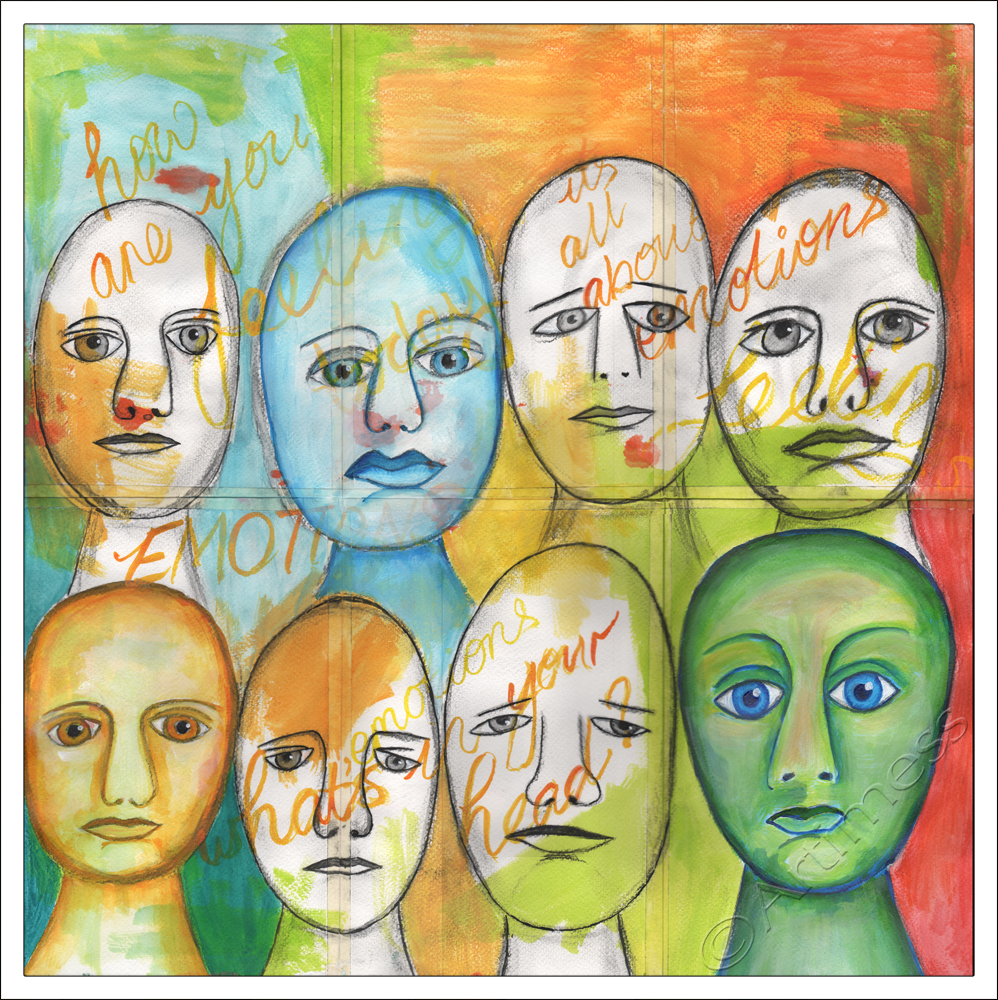
I ‘wrote’ the journalling using acrylic paint, added some colour to the background, then drew the faces using a charcoal stick. I coloured some of the faces using acrylic paint, then coloured the remaining background using a mixture of acrylic paint and neocolour crayons. Finally finished! Wow – that was some class Mitsi – thank you so much – I learnt a lot!
![]()
Transitions and Changes
Project #3 in Kate Crane’s 21 Secrets 2013 class called for us to draw three people representations and journal on their bodies. Just prior to watching Kate’s video, I had been reading these articles by William Bridges about transition and change: their meanings, the differences between them and their relationship to each other. While William Bridges is writing about these terms in relation to the work environment, I was thinking of them in a personal environment, and thought it would be interesting to use project #3 to journal about these ongoing experiences in my life. As a result I ended up with five figures!
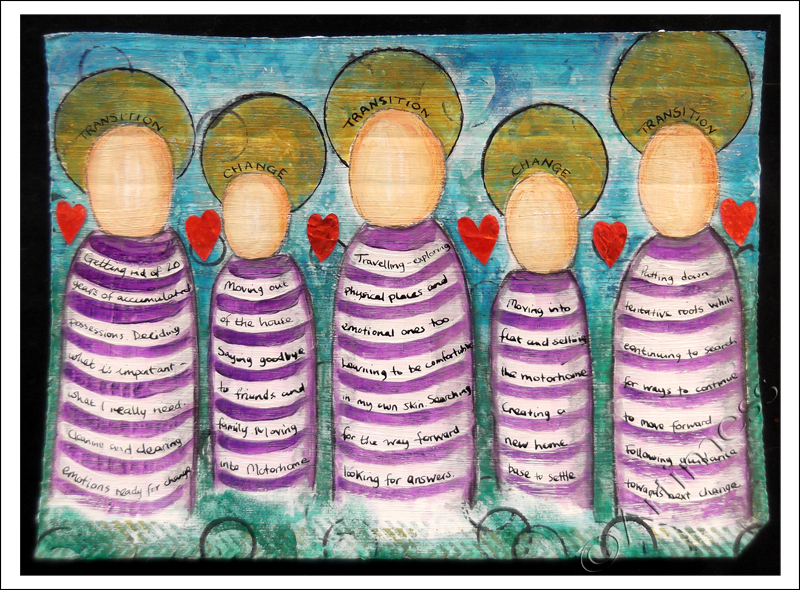
As before, I started off with a piece of recycled cardboard, but this time I began with two layers of white gesso. Next I positioned and lightly sketched my people, then painted the remaining background using acrylic paint and a variety of stencils, stamps and stamping junk (old bottle tops etc). I used more acrylic paint to paint my people, then added more depth to the colour using neocolour crayons. I added the journalling using a dip pen and black indian ink and finished the piece off with six hearts cut from leftover scraps from a previous project.
Three done, three more to go. Keep watching this space!
![]()
Sidetracked Again!
Ooops! – I got sidetracked again! But this Life Book lesson from Dawn DeVries Skol was just so much fun!

I started by painting the background using acrylic paint. I decided that I wanted the self-portrait to be transparent so I printed it on overhead projector film then cut it out and stuck it down using gel medium. It has left me with a slightly streaky face, but I like being able to see the background through the image. Next I added the journalling and doodling using Pitt Artist pens and coloured the large letters and doodles using neocolour crayons. Lastly I inked round the edges of the pages with a distress ink pad. Thank you Dawn for a really great lesson!
Now I really am going to get back to Dion Dior’s 21 Secrets Lesson!
![]()
Bloom Like Flowers
“The most precious gift we can offer others is our presence. When mindfulness embraces those we love, they will bloom like flowers.”
I thought this quotation from Thich Nhat Hanh was very appropriate for my journal spread inspired by Cathy Bluteau’s class on the 21 Secrets 2013 course.

Why is it that whenever you want a specific sort of image in a magazine you can never find what you want? I ended up sourcing my flowers online from Five5Cats who very kindly allows her images to be used for private artwork. Thank you Cindy!
I collaged the background using old papers and flowers, then added doodling using Pitt Artist Pens. I coloured my doodles using Inktense pencils and filled in with more collage using various tapes and pieces of old artwork. I created the quotation using digital text and finished off by adding details with Pitt pens, an Edding 780 paint marker, neocolour crayons and distress ink pads.
I’ve never done anything quite like this before, but I really enjoyed it and will definitely do some more pages using these techniques. Thank you Cathy for a great class!
![]()
Just Let Go…
“Just let go… … and soar to the heights …” was inspired by the second part of Carissa Paige’s class on the 21 Secrets 2013 course.That’s me painted over to look like a bird soaring in the sky – Oh how I envy the birds their ability to soar on the wind!

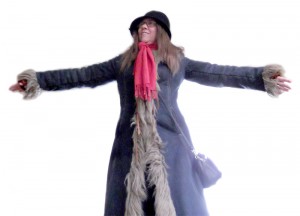
I created a background using a mixture of acrylic paint and spray ink then glued on this silly picture of me with my arms outstretched pretending to fly! I painted over the photo with acrylic paint, turning my arms into wings and giving myself some nice purple feathers and an orange beak, then added the digital text which I coloured using neocolour crayons. I finished it off by adding a couple of friends for me to fly with cut out from old paint stained tissues!

The arrival of this wonderful card from Australia has left me very sad. iHanna’s postcard swap 2013 is finally over! But I have got some beautiful reminders and some of the lovely people I’ve met want to keep in touch, so hopefully there’ll be some more artwork winging it’s way around the world. Meantime, if you hear of any more swaps – please let me know!
![]()
Beautiful Postcards
I had so much fun in March making 10 postcards to send out around the world as part of the iHanna Postcard Swap 2013, but this month has been just as much fun seeing what the postman has brought me every day.

These are the postcards I have received so far – aren’t they beautiful! And they came with lovely messages from all around the world. Thank you so much Hanna for all your hard work to make such a swap possible.
Yesterday I had every intention of getting messy and grungy and playing mixed media games, but life decided otherwise! So instead, I created another Quirky Bird. This one’s called Freda!

I painted her on calico, after using clear gesso to seal it. My original intention was to paint her using the natural calico colour as the background, but I made such a mess of drawing her, and the pencil lines wouldn’t rub out, so I ended up painting over the background to hide the mess!!
She’s painted using acrylic paint, neocolour crayons, Edding 780 paint marker and Pitt artist pens. Despite the early disaster, I don’t think she’s turned out too bad.
And now your must excuse me – I have an overdue date with some messy mixed media grunge!!
![]()