







Playing with Stencils
Since finishing my postcards, I have been busy playing with the new stencils I got last weekend. I always start my playing in my everyday notebook/journal, which is not quite big enough for the whole stencil.

I had a tiny bit of Light Molding Paste left in my pot so I thought I’d try it out with this Creative Expressions stencil. When it was dry, I painted it with acrylic paint, then added some green Perfect Pearls using a Versamark ink pad. Just to finish it off I added a shadow to the circles with a Unipin fine line pen. The scan really doesn’t show the lovely sparkly finish of the perfect pearls.

As I’d run out of texture paste, I thought I’d try creating a texture using some black gesso with this TCW stencil. At first I thought it had worked, but when it dried, it went rather flat! So I decided to add some colour to it using acrylic paint. I’m quite pleased with the way it turned out.

This last image is a digital blend of two scans of earlier acrylic paint prints using the two stencils above. I just love how many different effects it’s possible to get using stencils!
Handmade Postcards
Last Sunday we travelled to Harrogate and visited the Great Northern Papercrafts Extravaganza – great fun! I got some really cool stencils, stamps and dies which I have been playing with this week.
On Monday I signed up to take part in the iHannah’s DIY Postcard Swap 2013. (There’s still time to sign up if you’re interested, you just have to pledge to post 10 handmade cards by 30th March.) So I have been busy this week making my ten cards for the swap.

I started by creating a set of coloured backgrounds using Inktense Watercolour pencils. Next I added a contrasting colour using Acrylic paint and an Artist Cellar Stencil followed by a stamped image from IndigoBlu using a mixture of distress ink and staz-on ink pads. I followed this with a layer of gel medium to seal everything and to stick on the word definition tags, which I created using more stamps from IndigoBlu and a Creative Expressions stencil, and the die cut letters from memory box. Lastly I added another layer using the same stencil with acrylic paint.

I created the backs of the postcards using a free postcard backside from iHannah which I had to resize to fit my postcards, then added a digital stamp which I made using a scan of another Creative Expressions stencil, some hand drawn bird shapes and a quotation from Friedrich Nietzsche.
The completed postcards are now sitting waiting for their recipients addresses to be added!
Totally Addictive!
The trouble with playing digital is that it’s totally addictive! I’ve always loved kaleidoscopes so I had to have another go.

Using the same original images as yesterday, this is today’s version! I think this is my favourite so far. What do you think?
Playing with Blending!
I’ve been so busy drawing and painting lately that I haven’t had time for playing with digital blending. So today I thought I’d rectify that omission!

I started out with an artwork scan and two photographs. This was the first result. I really like this one, but decided to have a go at making a kaleidoscope style mandala.

This was the result! Which one do you prefer?
Mystery Muse
Now that February is over and my Mystery Musee has safely received her gifts, I can show you what I’ve been up to! I took part in the Artella Mystery Muse 2013 Project; you submit your details and a word which sums up the year for you and get given in return a “Mystery Musee” person to send two hand made gifts to in the month of February. I had great fun making gifts for my “Mystery Musee”.

The first gift I sent was this collaged playing card with her word for the year on the back enclosed in the altered envelope.
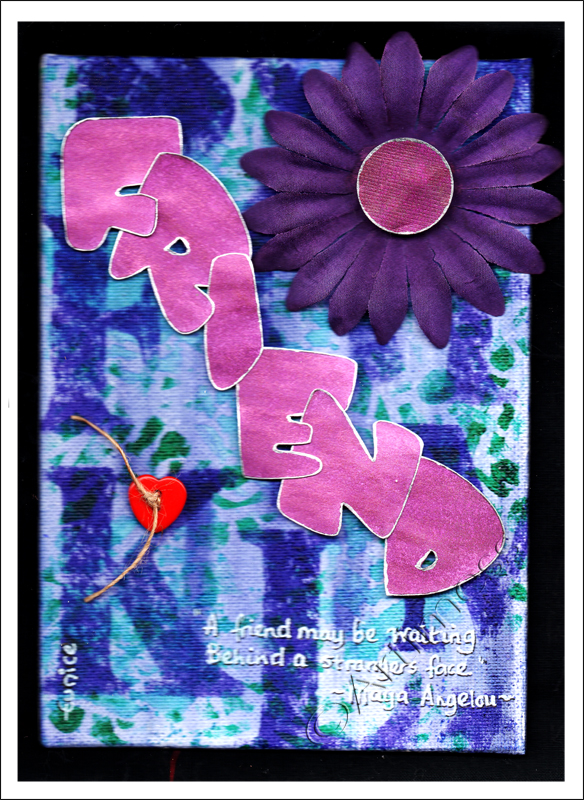
For her second gift I made this canvas board collage using letter stencils and a quotation from Maya Angelou.
In return, I received 2 beautiful gifts from a different person who had been given my details. It was so lovely to receive surprise ‘snail mail’ and inspirational to see another persons work in this way. I will definitely be signing up for this challenge again next year, and will be looking out for other hand made/artwork exchanges during the rest of the year. Do you know of any?
Zentangling again!
I’ve been zentangling again! Only this time I forgot to scan before I started painting.

I chose an Ankh as my central image – said to represent eternal life, dating back to Egyptian times. As with the others, I drew it using a unipin fine line pen and coloured it using Twinkling H2O’s. I added a small gem stone to the centre which made it impossible to scan! No matter how hard I try to capture it, the image is a pale shadow of the original!
60 Goals!
I just read this post from Samie (Journal Girl) and (having just passed a major milestone) was inspired to create a similar piece for myself. Only trouble is – I have more than double the goals to create. But I did it!!
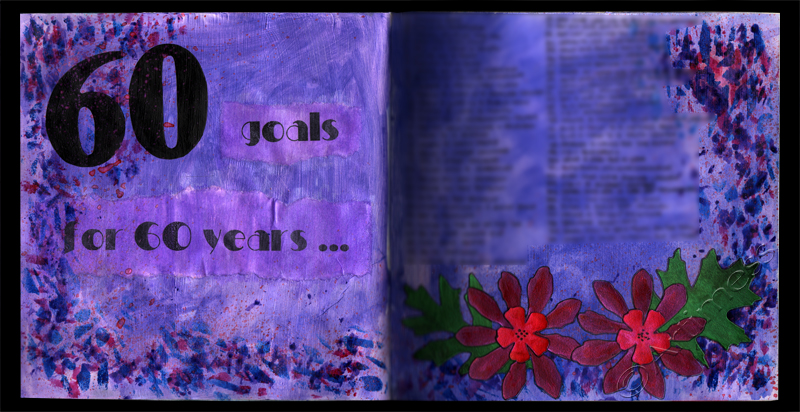
I had great fun! I started off with a gesso base, then added a wash of acrylic colour. I created the text using a mixture of Stencils with acrylic paint and computer generated text washed with Twinkling H2O’s. Next came a border using stencils and Twinkling H2O’s. I added my 60 goals using a Unipin fine line pen. Lastly, I splattered a bit more colour with some paintbrush flicking and collaged some die cut flowers and leaves coloured with Twinkling H2O’s.
I’ve blurred out my goals for now, but will reveal them in a years time when I review them to see how many I’ve achieved!
More Zentangles!
I’ve rather got hooked on these Zentangle doodles – looks like I’m going for a series!

I chose to use the sun as my central image this time. Everything is drawn freehand, which is why the box is not quite square to the page on this one – just call it artistic license!
Once again I used my Unipin Fine Line pen – I think I’m going to have to bulk buy these if I do many more of these zentangles!

I just wish the scan could show the wonderful shimmer that the Twinkling H2O’s add to the image!
Doodling and H2O’s!
Still inspired by Jodi Ohl’s Just do it – Free Art Friday post, I decided to create another stained glass image, but to cover it in doodles in the style of my zentangle drawings. I used a 5″x7″ canvas board to draw it on.

I doodled using a Unipin fine line pen which claims to be ‘water and fade proof’. “Hmmm, we’ll see about that!” … I thought. My record with so called waterproof pens is not very good!

Wow – I’m impressed! Not a smudge or a smear anywhere! These pens are good! I used Twinkling H2O’s to add the colour, so the ink got verrry wet! Now that it’s finished, I think it looks kind of mandala-ish – the way it pulls your eyes in to focus on the heart. It wasn’t intentional, but I rather like it. What do you think?

Blending and Faces!
I’ve been playing blending again! I made a stained glass window image inspired by Jodi Ohl’s Just do it – Free Art Friday post.

But unlike Jodi, I didn’t doodle on my painting, I scanned it and played digital blending with it!
Then I thought it might be a good idea to finish face #16 which has been lurking accusingly for a while now!

I’m glad I did – I’m quite pleased with how she turned out – she’s definitely one of my better faces! I drew her in pencil and coloured her using acrylic paint and watercolour pencils. Now what shall I do next?